How to service, maintain, and fix my cycle breakdown on an all India tour?
The biggest fear for most cyclists who go on a tour is the occurrence of a breakdown. Maintaining and being prepared for cycle breakdowns is not as hard a job as it seems to be. Considering the simplicity of a cycle, there is only a fixed set of things you need to be aware of before heading out on your tour. Knowledge to fix the bike just enough that you will be able to reach the next town is all you need to have to overcome your demons.
In this article, I will give you an idea of how to maintain the drivetrain of your cycle which will prevent a lot of issues in the long run, and also all the frequently occurring cycle breakdowns and how to handle them. Attempt all of these at least once and feel free to mess around and get them fixed by the local store before heading out. This will give you the confidence to set off on your journey with a lot of ease and comfort.
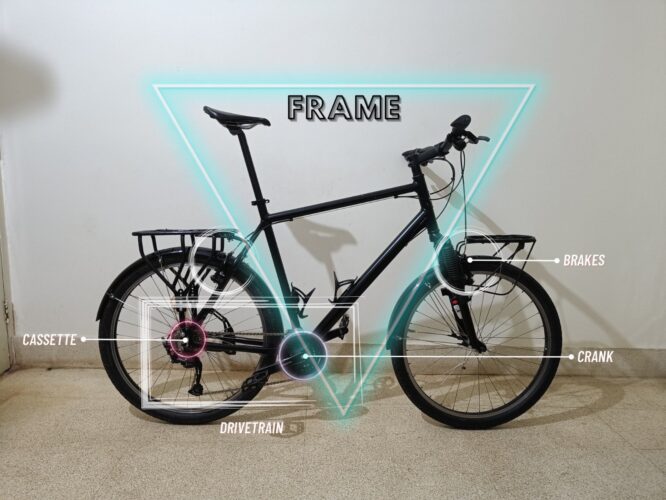
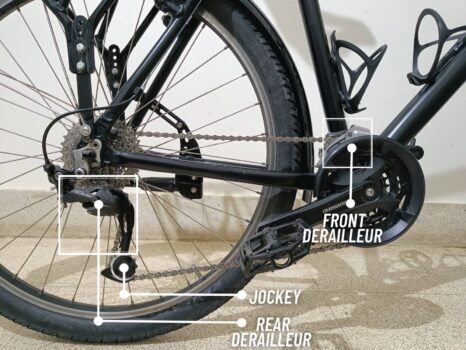
As such cycles need very little maintenance and it is mostly centred around the drivetrain. A bike is simply put: frame + drivetrain + breaks. A drivetrain is a mechanical part of the cycle which allows you to pedal and move it. Everything apart from this would be considered the frame of the bike. The crank and cassette are the teeth-bearing wheels over which the chain sits and slides for different ratios of teeth on both. The larger the number of teeth on the crank which is located in the front, the harder it is to bike and vice versa for the cassette at the rear. The derailleurs are what hold the chain over the crank and the cassette at the right teeth ratio so that you can effortlessly pedal with minimal energy and speed compromise. Shifters on your handlebars are connected to the front and the rear derailleurs attached to the crank and the cassette respectively through cables.
There are two types of brake systems, a V-brake and a disc brake system. I hope you have invested in the V-brakes as these are fairly easier to fix and less prone to breakdowns compared to the disc brake systems. To understand the type of cycle you need to invest in for cycle touring, read this blog: Which cycle is best for touring India?
Other technicalities such as the hub over which the cassette sits, and the bottom bracket over which the crank sits, is information not very necessary as these components break down once in a blue moon. Even if they did, you can not equip yourself for fixing these issues. Find a bus to hitch a ride to the nearest town under such drastic breakdowns!
Table of Contents
ToggleMaintenance
1. Drivetrain
Since this is the mechanical part of the cycle which constantly moves and is subjected to a lot of friction, having all the parts cleaned and lubricated will increase the lifespan of the components substantially. The crank should ideally last more than 25,000 Kms, the cassette around 7,500 – 10,000 Kms, and the chain roughly around 3,000 – 3,500 Km. If maintained well, they can last long or far lesser.
Every once in 2-3 weeks in dry weather, or every week during the rainy season, make sure to clean the entire drivetrain thoroughly and lubricate it. The way you do this is by washing it with water containing a mild detergent (dish wash/clothes washing solution) to remove the clogged matter. Make use of a brush (even a toothbrush will do) to wipe out all the clogged matter, especially in the region of the jockey wheels, cassette, and the entire chain. You will see that once the clogged matter is off, the chain starts to shine like it is brand new. rinse off all the soap and wipe the entire drivetrain with a clean dry cloth.
After a couple of hours, when the components have dried completely, add 6-8 drops of lube over the chain and spin it at all gear ratios to evenly distribute the lube over the drivetrain. Voila! You are good to go.
2. Brake shoes
Break shoes usually last for 5,000 Km based on the terrain you ride on. The longer the time spent riding downhill and applying brakes, the shorter its lifespan. Shoe pads have markings on them beyond which if they are rubbed off, they will need to be changed. Make sure you go to the local cycle store and figure out how to remove these and replace them. All you will need is an Allen key set and a bit of patience to have the right brake tightness.
Breakdowns
1. Flat tyre
A flat tyre is the most commonly occurring cycle breakdown for a cyclist. When you face a flat tyre, invert the entire cycle so that it lies on its saddle and handlebar, and pull out the wheel. Use two levers to open up the tyre and insert the fresh tube. If you haven’t learnt to do this yet, make sure you open up the tube and fix it back at least a couple of times till you are confident. Removing and re-inserting the rear wheel can seem a little tricky initially considering that the cassette has to sit in place over the rear derailleur. If you have still not learned this, it is okay. Although irritating, this is one of the least intimidating tasks to perform. Have your wheels inserted with tyre liners to reduce the number of flats so that you do not have to face this problem often.
2. Jumping gears
If you have ever had this problem, you know how annoying it can be. Riding on the hills turns out to be almost impossible with the chain automatically shuffling between the easy and the hard gear ratios. The noise from all the jumping simply adds to the woes. Luckily solving this is no rocket science. The cable either gets loosened because of which the chain keeps slipping down from gear 1 to gear 2, or it gets tightened because of which you will not be able to reach the final hardest gear.
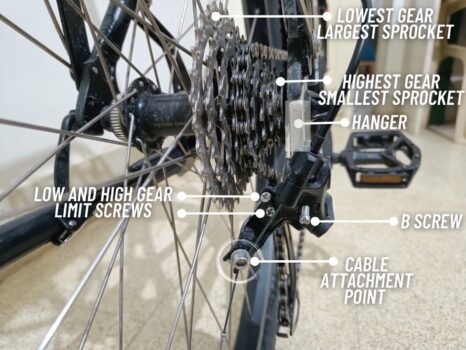
Over the body of the rear derailleur, there are two screws called the high gear limit screw and the low gear limit screws. The high gear screw prevents the derailleur from going past the last highest gear and the low gear screw prevents the derailleur from going past the lowest and easiest gear (largest sprocket). If the chain is constantly slipping from gear 1 to gear 2, loosen the low gear limit screw just a tad bit until the jumping stops. Similarly, if you are not able to easily engage in the final hardest gear (smallest sprocket), loosen the high gear limit screw a tad bit until the chain smoothly engages in the last gear.
This should set right the issue of jumping gears. If you continue to have gears jumping after this tuning, it could mean that the rear derailleur hanger, which holds the derailleur in place is slightly bent. Attempt replacing the hanger to see if it solves the issue.
If the rear derailleur is making a lot of chain rubbing noise without any gear jumping, that would mean that the distance between the cog and the pulley has reduced allowing the chain to rub against the cassette. It is not necessary that you know this, but if you face such an issue where the chain makes a noise form the RD but isn’t jumping gears, tighten the B screw on the rear derailleur which will increase the space between the pulley and the cog, rectifying the issue immediately.
3. Rear derailleur hanger replacement
If you have a fall on the side of the drivetrain, the worst possible outcome is that the hanger bends, cracks, or breaks. Luckily it is not hard to replace it with a fresh hanger if you are carrying one. Hangers are bike specific and only the ones that fit the frame have to be purchased. Visit the local bike store and request a spare hanger. A couple of screws, a screwdriver, and a bit of patience is all it takes to replace the hanger with a fresh copy. Make sure to immediately purchase another hanger as a spare for replacements in the future.
4. The cables are old and broken
If the gears continue to jump after all this tweaking, it could only mean that the cables are old and need a replacement, or the chain has had its share of life. To replace the gear cable, place the rear derailleur to the toughest gear, unscrew the old cable from the derailleur and pull it out. Making use of a plier, pull the newly inserted cable to lock it in place and screw it up. Based on how much the gears jump, follow the tuning process by slightly loosening either the low or high gear limit screws.
If the cables for the brakes get stuck, similar to the gears, unscrew the cables, insert fresh ones and lock them in place. Hold the V-brakes at the required tightness and tighten the stress to have the cable fixed.
5. Chain break
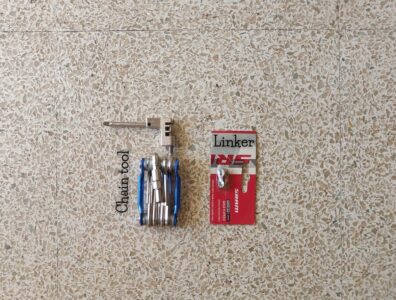
Occasionally we see that the chain simply falls dead to the ground because of a break in the middle. Where the chain is broken, on either side, the hinges have to be removed making use of a chain tool and a linker has to be inserted in between. To avoid carrying extra accessories on the cycle, you can purchase an Allen key set that comes with a chain tool. Once the hinges are removed, a chain tool has to simply be put in place and pulled so that it holds the loose ends in place.
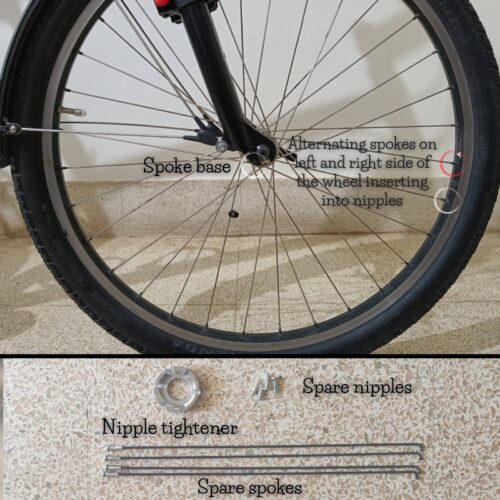
6. Spokes break off
Apart from the flat tyre, the next biggest technical issue you will face during a cycle tour is that some spokes break off. The large luggage we carry levies a large amount of weight on the spokes, eventually leading them to snap. Always carry the right set of replacement spokes. Understand if your wheels are either 26″, 27.5″, or 29″ in diameter, and purchase the corresponding spokes as spares.
The spokes can either break near the hub of the wheel or near the nipple, close to the periphery of the wheel. If the spokes break open near the hub, it is fairly simple to replace it. Deflate the tyres, open the wheel, and insert the spoke first at the hub end followed by the loosened nipple. Proceed to tighten the nipple to hold the spoke in place. If the spoke breaks at the nipple, the tyre, tube, and inside liner have to be removed and the old nipple has to be replaced with a fresh one from the inside of the wheel.
Once the spoke is fixed, see to it that the wheel does not wobble or bend towards one side. If the wheel tends to wobble more towards the left, tighten the nipples for the spokes on the right using a nipple tightener, and if the wheel wobbles more to the left, tighten the nipples to the left to eventually have the wheels rotating without wobble.
To learn about all the tools, spares, and cycling equipment that need to be carried on the tour, read the cycling spares and equipment section of this blog: What and how to pack for an all India cycle tour? The complete checklist.
I am a 31 year young PhD graduate who has decided to travel the length and breadth of India on my cycle, to document the journey of meeting a vast array of people. In my journey, I intend to understand the characteristic features of the people of this nation and categorize them based on their demographics, age, profession, gender, traditions, and cultural differences.
